
In the previous post, basics of Active Directory have been discussed. In this post, we’ll discuss how the environment can be setup and configured, so we can use it to perform various attack scenarios and detections for the same. We’ll discuss both how it can be done from both GUI as well as CLI way.
Active Directory Setup
Let’s start with the Active Directory lab Setup. We’ll start with creating a Forest root domain first. Then we’ll add a domain into the forest. We can also add one or more child domains and external domain to the forest.
After the forest root domain is created, we’ll focus on populating the Active directory environment with AD objects like user objects, computer objects, group objects, network shares etc. and then will see how a computer can join the domain.
Create a VM
To get started, we’ll install Windows Server 2019 OS inside a Virtual machine. Virtual machine can be created inside Vmware Workstation or Oracle VirtualBox or any other hypervisor. And the Windows Server ISO evaluation version can be used for this purpose which is available on Microsoft evaluation. Note– Always download the evaluation copy of server OS ISO files from Microsoft’s Evaluation Center here.
Once the installation is done, we’ll configure the basic requirements for creating a Active Directory forest.
Change the hostname
To change the hostname of the machine, open system properties by running sysdm.cpl. It will give you the option to rename the hostname from the GUI. It requires a system reboot to reflect the changes.
Proper naming convention must be used while changing the hostname, so that it’s easy to remember which server is DC, File Server, DHCP server etc.
Hostname can also be changed using below powershell command:
Rename-Computer -NewName "RDSDC01" -Restart
Assign an IP address to the host.
Go to network properties to assign IP to the machine. Type ncpa.cpl in RUN to open network and sharing center. Assign a static IP address to the machine. Select the first option: – Role-based or feature-based installation
Add required Roles
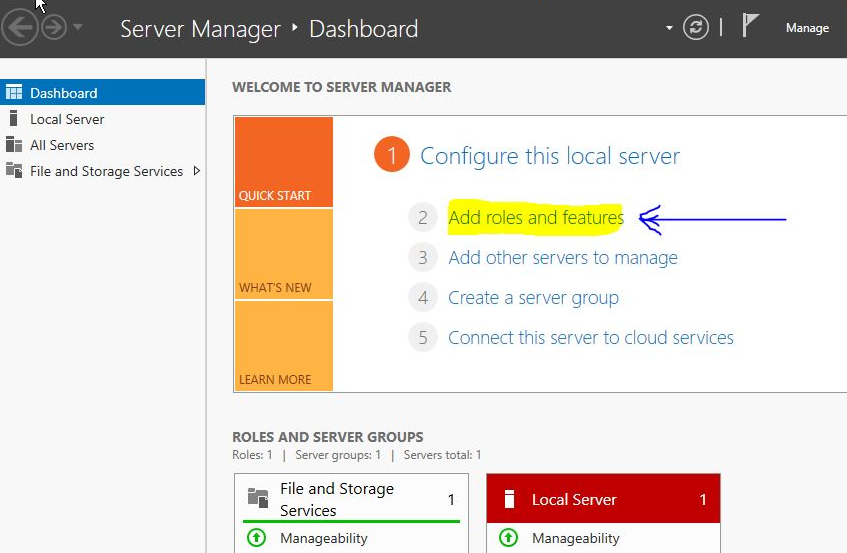
After providing a hostname and changing the IP address, we’ll go to Server Manager and click Add roles and features
 Select the first option: – Role-based or feature-based installation
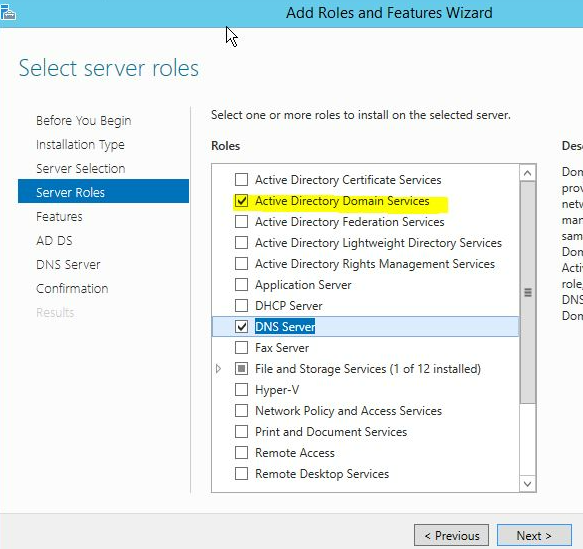
Click next until you reach the step to select roles. Select “Active Directory Domain Services” and click “Add Features” to the window that pops up. Click next.
Promoting the Server to a Domain Controller
After the roles and features are installed, select the option to “Promote this Server to Domain Controller”
Add a new forest
Here, it shows an option to create a forest. Select “Add a New Forest” and enter a domain name. I named the forest as “rootdse.lab”.
Click next. On the next screen, leave the defaults as it is and create a recovery password. This is called DSRM password (Directory Services Restore Mode). This password provides the administrator with a kind-of backdoor to the AD database in case there is some issue with the domain or when you need to restore/recover the AD database.
Reboot
Just accept the defaults in the next series of prompts. It will check some pre-requisites and show some warnings, that’s Okay. Click “Install”. Now in the backend, installation and configuration of Active Directory and DNS will take place and then the server will reboot. After the reboot, your domain controller is ready! A logon screen will appear. You can log in using the same Administrator account. Please note that now the account is promoted to a Domain Administrator as the computer is a Domain Controller now.
Command Line
Using a Powershell Script
I’ve created a powershell script using the commands above to create the forest automatically which requires two arguments as follows:
- Domain
- DSRM password
Once these arguments are passed, it’ll take few minutes and the forest will be installed and a reboot will reflect the changes automatically.
Now’ we’ll run the script to install the required roles and AD forest.
Let’s see how these work:
Below function will take care of installing the Roles required:
function InstallADRole {
    Write-Host "[+] Installing required AD Roles and features." -ForegroundColor 'Green'
    Install-windowsFeature AD-Domain-Services
    Add-windowsfeature RSAT-ADDS
    Import-Module ADDSDeployment
    Write-Host "`n`nAD Roles and features are installed.`n`n" -ForegroundColor "Gray"
    }
Next function is to Install the AD Forest.
function ADforestInstall {
    Write-Host "[+] Installing AD forest $DomainName" -ForegroundColor 'Green'
    $DomainNetBiosName = $DomainName.split('.')[0]
    Install-ADDSForest -CreateDnsDelegation:$false -DatabasePath "C:\\Windows\\NTDS" -DomainMode "7" -DomainName $DomainName -DomainNetbiosName $DomainNetBiosName -ForestMode "7" -InstallDns:$true -LogPath "C:\\Windows\\NTDS" -NoRebootOnCompletion:$false -SysvolPath "C:\\Windows\\SYSVOL" -Force:$true -SkipPreChecks -SafeModeAdministratorPassword $pass
    Write-Host "`n`n$DomainName has been installed successfully. Domain controller will restart`n`n" -ForegroundColor 'Gray'
}
Now a function to call these two functions and pass the domain name to the ADforestInstall function. And this will also prompt for a DSRM password:
function Invoke-ADForest
    {
        Param
        ([Parameter(Mandatory=$true, Position=0)] [string] $DomainName)
        $pass = Read-Host -Prompt "Set Safe Mode Administrator Password" -AsSecureString
        InstallADRole
        ADforestInstall
    }
It’ll take few minutes for the forest to be installed.
The script can be downloaded from my Github Account here.